 I guess i'll try my hand at helping some people out, considering we borrowed the idea from this site. My wife and I spent way too much time at Ikea, we hate shopping there, it takes forever to get thru the store, always takes 1 to 2 hours to pay, then took another 1 hour to set up delivery. With that said, we finally made it home with Stolmen poles (3 poles and the accompanying brackets that come with them). We purchased the PAX Lyngdal Sliding doors (118" x 92 7/8") size. For the floor we purchased some adjustable sliding door guides (at home depot).
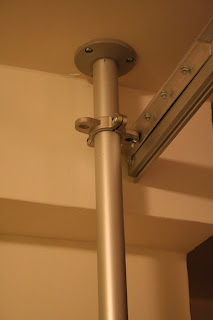
Installing the poles: i lined up the poles into their spot, and screwed them into the concrete ceiling using what i think was single expansion anchors. Assuming you have concrete ceilings, remember to pre-drill the holes for the anchors. Adjust the poles for the height of the ceilings, tighten the pole system by twisting the poles tight, and make sure you have a snug fit (before completely tightening the screw at the bottom of the pole. Take a level, and make sure that your pole is level on 2 sides (front to back/side to side).
Track System: I reinforced the track by using an Angle piece of metal 1/8" thick by 3/4" each side. I bought one that was 36" in length, cut them into 3 pieces of 12" each. i drilled holes thru the top of the track and thru the angle, and secured the angle to the track using small 1/2" screws with nuts. I placed each 12" angle piece at each end of the track and one in the middle, which also helped to add reinforcement to the small piece of metal the track system brings to unite both tracks. You will need to make an extra hole for the screw and nut that will be used to secure the track to the poles (for this i used a thicker gauge screw/nut and 1" in length and used a washer as well)
Next, you will need to secure the track to the poles. Attach the brackets that come with the Stolmen poles, to the top part of the pole. You should now have a track system, that is reinforced with angles (secured with small screws/nuts) and one big screw/nut that will be used to secure the track to the pole. present the track onto poles (for me, 5 inches from the ceiling to the top of the track was good height for doors to fit), and secure the track with the 1" screw/washer/nut.
Next, you can build the doors (you will end up with a lot of extra pieces that were meant for the closet system...like bottom tracks, bottom door guides, covers, a bunch of wood screws, etc). once you have the doors built, present them onto the track to make sure everything works. Remember to unlock the grey levers on the inside door ( i tried hanging the doors with them in the lock position, and doors kept falling). once doors are on, and rolling, lock the lever. The outside doors have something similar.
Finally, with the doors hanging, i leveled the doors straight and installed the small door guides on the floor, in order to do 2 things: Most important, keeping the doors hanging straight up/down, and 2: a way to have them sliding fairly straight.

